This manual gives a practical guide to the usage of the PuffinPlot palaeomagnetic data analysis program. Note that it does not elucidate the principles of the analysis techniques themselves, and a working knowledge of palaeomagnetic procedures is assumed. For excellent introductions to palaeomagnetic analysis, see Tauxe et al. (2010) or Butler (1992).
If you use PuffinPlot in the creation of published work, please cite the PuffinPlot paper (Lurcock and Wilson, 2012). See Appendix 8 for further details.
PuffinPlot is free software, distributed under the GNU General Public License. Please see the LICENCE file in the PuffinPlot archive for details. PuffinPlot is copyright 2012–2017 by Pontus Lurcock. The PuffinPlot website is located at http://talvi.net/puffinplot.
This section describes the hardware and software requirements for running PuffinPlot, and gives instructions for installing and running it.
PuffinPlot runs on the Java platform (version 8 or later), which is preinstalled or freely available for a variety of operating systems, including Windows, Linux, and Mac OS X. Java is generally easy to install, but detailed instructions for installing it are beyond the scope of this manual; please consult the documentation for your operating system or visit http://www.java.com/ for details. (If you are constrained to use an older version of Java on your system, you may still be able to run an old version of PuffinPlot: version 1.03 of PuffinPlot works on Java 7, version 1.02 on Java 6, and version 1.01 on Java 5.)
You may download the latest version of PuffinPlot from https://github.com/pont-_us/PuffinPlot/releases. PuffinPlot is distributed as a single zip archive file containing the program itself (in two different variants, as detailed below) and documentation. The documentation consists of this manual (in both HTML and PDF format) and a JavaDoc folder, containing documentation for PuffinPlot’s source code. The JavaDoc is only of interest to users wishing to write scripts which interface directly with PuffinPlot’s internal data structures (see section 4.8). Table 1 lists the contents of the PuffinPlot archive. After downloading the archive, move it to the folder where you would like PuffinPlot installed and extract its contents there.
| File | Description |
| README | A text file briefly describing the archive. |
| PuffinPlot.jar | The PuffinPlot program (suitable for all operating systems) |
| PuffinPlot.app | The PuffinPlot program (tailored for Mac OS X) |
| Manual | Folder containing this manual in PDF and HTML format |
| JavaDoc | Folder containing internal documentation for PuffinPlot |
| Examples | Folder containing example data files and scripts |
| LICENCE | The licence under which PuffinPlot is distributed |
The file PuffinPlot.jar in the archive is the PuffinPlot program itself, as a cross-platform jar (Java archive) file. This file is recommended for Linux, Windows, and other non-Mac operating systems; it will also run on Mac OS X, but the specific Mac OS X version described below is usually preferable. The details of starting PuffinPlot vary between operating systems, but double-clicking on the file PuffinPlot.jar is the most common method. In some cases it may be necessary to right-click on the file and select Open with Java runtime or some similar text from a menu. PuffinPlot can also be started from a terminal prompt by setting the current folder to the one containing PuffinPlot, and typing java -jar PuffinPlot.jar.
Note for Windows users. Under Windows, other programs may occasionally interfere with the Java platform; if you have the Java platform installed on Windows but are still unable to run jar files such as PuffinPlot.jar, the situation can usually be fixed by running the jarfix program. At the time of writing, jarfix may be downloaded from http://johann.loefflmann.net/en/software/jarfix/.
The PuffinPlot archive also contains a special variant of the program for Mac OS X. This variant is packaged as a standard OS X application and conforms more nearly to OS X user interface standards than the cross-platform version described in the previous section. It is named ‘PuffinPlot.app’, although the extension ‘.app’ is usually hidden by Mac OS X.
In the extracted archive contents, the PuffinPlot application is shown as an icon representing a puffin (specifically, the Atlantic Puffin Fratercula arctica). This application may be dragged into the Applications folder, or any other convenient place.
PuffinPlot is started by double-clicking on its application icon. Recent versions of Mac OS X include a security feature called ‘Gatekeeper’, which may prevent PuffinPlot from running. The Apple support note at http://support.apple.com/en-_gb/HT202491 gives instructions for configuring Gatekeeper to allow the execution of an ‘unidentified’ application such as PuffinPlot.
This section gives a brief introduction to the PuffinPlot data model and to the features of its main window.
PuffinPlot provides a large number of keyboard shortcuts for its various capabilities; most of them involve holding down the Ctrl key while pressing another key. On Mac OS X, these shortcuts use the command key rather than the Ctrl key, in accordance with Apple user interface guidelines. Throughout this manual, keyboard shortcuts will be given as (for example) Ctrl-A. Users of Mac OS X should read these shortcuts as command-A, etc.
To open a file, select Open… from the File menu. This will allow you to choose one or more files to open from a standard file selection window. You may also select an entire folder; in this case every file within the folder will be opened and combined into a single suite. (On Mac OS X, you can’t choose a folder in the normal ‘Open file’ dialog; you have to select the Open folder… menu item instead.) You can also open a file, folder, or group of files by dragging them onto the main PuffinPlot window. Note: if you open multiple files or a whole folder, they must have the same file type, the same treatment type (thermal, alternating-field, etc.), and the same sample type (discrete or continuous). Opening, for example, a mixture of Caltech and IAPD files, or a mixture of discrete and continuous files, may result in errors during file reading.
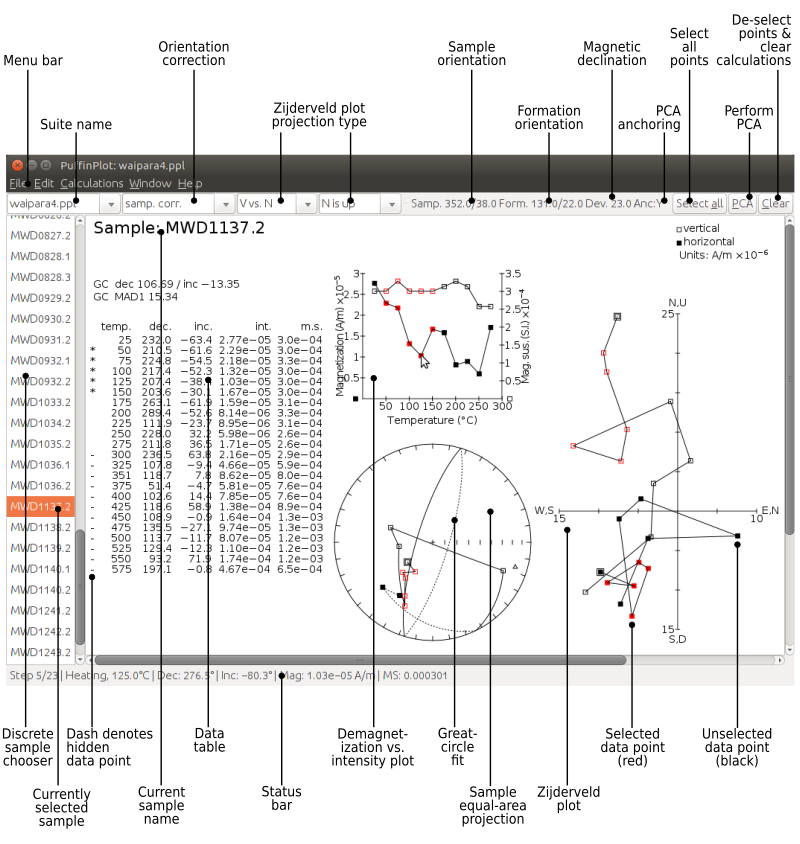
Figure 1 shows an annotated screenshot of PuffinPlot’s main window with a discrete sample data file open. The bulk of the window is devoted to the data display itself, and shows the four most popular data display methods for palaeomagnetic data: a table, a Zijderveld plot, an equal-area projection, and a demagnetization-intensity biplot (which also shows an overlaid magnetic susceptibility plot). The plots are interactive, in that individual data points may be selected by clicking or by dragging a rectangle with the mouse. The plot layout is configurable: the sizes and positions of the plots can be changed, and plots can be added to and removed from the display.
To the left of the main plot display area is the sample chooser, which shows a complete list of the samples within the suite, with the currently selected sample highlighted. Multiple samples may be selected at once allowing functions such as PCA calculation to be performed en masse. If a long core data file is loaded, the sample chooser is shown as a vertical slider indicating depth rather than a list of sample names.
Above the main plot area is the toolbar, which gives convenient access to some of the most frequently used facilities of the program. From left to right, these are: choosers for the currently displayed data suite, the orientation correction, and the Zijderveld projection type; displays of the sample and formation orientations and magnetic declination; and buttons for three of the most commonly performed actions.
At the top of the window is the menu bar, providing access to all the program’s functions in a hierarchical manner. On Mac OS, the menu bar is at the top of the screen rather than the top of the window, and includes an extra menu at the left, entitled PuffinPlot.
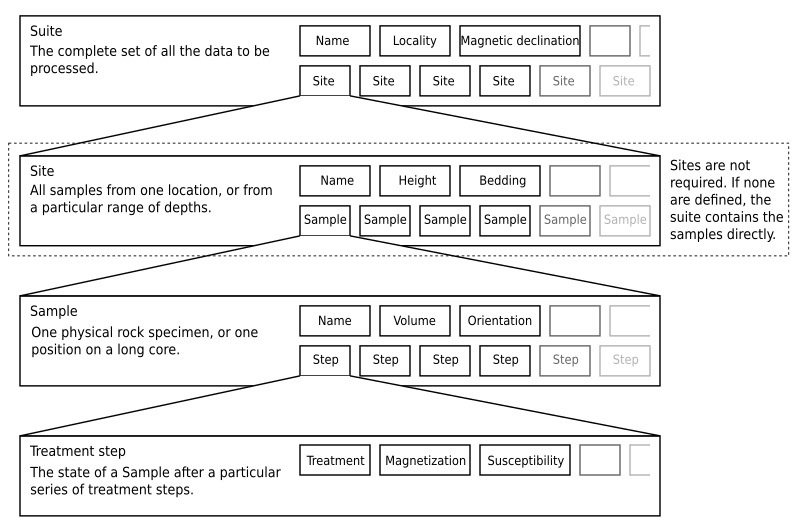
PuffinPlot uses a hierarchical data structure, with higher levels containing multiple instances of each lower level. The structure is summarized in Figure 2. At the top is the suite, which contains all the data to be analysed as part of a particular study. For a discrete specimen study, this will typically correspond to a section in the field; for a long core study, it will correspond to a core. A suite is initially created by opening one or more data files from a magnetometer; it is saved as a file in PuffinPlot’s own format. A suite can contain multiple sites. A site corresponds to a set of samples taken from one spot in a section (or from a particular range of depths). A site’s associated data can include such things as bedding attitude and stratigraphic height, as well as calculated parameters such as the mean palaeomagnetic direction for all the samples at the site. Sites are not required: if no sites have been defined, samples are contained directly within the suite.
Each site (or, if no sites are defined, the suite) contains multiple samples. A sample corresponds to a small physical volume of rock. For a discrete study, this will usually be a typical palaeomagnetic 25mm cylinder or IODP cube sample. For long cores, it is the portion of the core at a particular depth. The data associated with a sample consists of information specific to this physical unit which does not change with the application of demagnetization techniques — for example, a sample code or name (or, for long cores, a depth), the field orientation of the sample, and its volume. For discrete samples this data can also include a tensor representing anisotropy of magnetic susceptibility, which is imported separately from an Agico kappabridge datafile and collated with the magnetization data by matching the sample names. The sample can also contain calculated parameters, such as a direction fitted by principal component analysis, or a best-fitting great circle.
Each sample contains multiple demagnetization steps. A step represents a sample at a particular point during the treatment protocol. Its associated data thus includes details of the treatment: the type (thermal, AF, IRM, etc.) and parameters (temperature, field strength, etc.). The data also includes the state of the sample itself — most importantly, the measured magnetization vector. For thermal studies, the magnetic susceptibility is usually also recorded after every heating cycle, and is also stored as part of the step.
This section describes the parts and functions of the main PuffinPlot window, as shown in figure 1.
The plot area is the largest part of the window, and plots the data for the current sample using various plots. By default, four plots are shown: a demagnetization-intensity biplot, a Zijderveld plot, an equal-area projection, and a table of demagnetization steps. The plots can be moved and resized (see section 4.3.2). Other plots are also available, and the preferences window can be used to control which plots are displayed (see section 4.4).
The sample chooser sits at the leftmost edge of the main window, and allows you to change the current sample (the one for which data is plotted) and the set of selected samples (most of PuffinPlot’s functions operate on the currently selected samples). Often, the set of selected samples will consist only of the current sample.
The sample chooser takes two forms, depending on whether the current suite of data is for discrete samples or for a continuous long core measurement.
Using the discrete sample chooser
The discrete sample chooser shows the names of the samples in the current suite. The selected sample or samples are highlighted in a different colour. The selected sample is the current sample, and its data is displayed in the main plot area. If more than one sample is selected, the first of the selected samples is the current sample.
To select a single sample, click on its name. To select a contiguous range of samples, click at one end of the range, then hold down Shift while clicking at the other end of the range. To select multiple, non-contiguous samples, hold down Ctrl while clicking. To select all samples, press Ctrl-A.
Using the continuous sample chooser
The continuous sample chooser is a vertical grey bar representing the total length of the measured core, striped with horizontal white lines representing the individual measurements at each depth. (If there are too many measurements for all the requisite white lines to be displayed, they are omitted.) A black triangle and line show the current depth; this is the depth for which the data is displayed in the main window. If there are selected samples, they are highlighted in red on the sample chooser.
To select a single depth, click on the appropriate part of the sample chooser. To scroll rapidly through a range of samples, click and drag the mouse along the sample chooser. To select a range of samples, hold down Shift, then click, drag, and release the mouse on the chooser.
Keyboard shortcuts for sample selection
Use Ctrl-B and Ctrl-N to change the current sample. Use Ctrl-A to select all the samples in the current suite. You can also use the up and down arrow keys to change the sample.
The toolbar displays various data and provides several controls. From left to right, these are:
This section gives a methodical account of PuffinPlot’s features.
This section lists all the items in PuffinPlot’s menus, giving a brief description of the functionality associated with each one.
This menu contains functions connected with opening, closing, and saving files.
reads one or more files of demagnetization data into PuffinPlot as a new suite. See section 4.2.1 for details of supported filetypes.
reads a whole folder of data files into PuffinPlot. This menu item only appears on OS X; on other operating systems, the Open… menu item also allows selection of entire folders.
is a submenu which contains the names of the last eight files which have been opened in PuffinPlot, allowing them to be opened again with a single click.
saves the current suite as a PuffinPlot file. If the suite was opened from a PuffinPlot file or if it has been previously saved as a PuffinPlot file, it will immediately be saved to that file. If no PuffinPlot file is associated with this suite yet, a standard ‘save file’ dialog box will prompt you for a file name and location.
allows you to save the current suite to a different filename or location.
closes the current suite, removing it from PuffinPlot’s data display.
is a submenu allowing the export of various kinds of data to CSV files.
saves a file containing all the data associated with individual samples. Table 2 describes the fields which make up the file.
| Field name | Description |
| Suite | Suite name |
| Sample | Sample name (only present in discrete files) |
| Depth | Depth in core (only present in long core files) |
| NRM intensity (A/m) | NRM intensity in A/m |
| MS jump temp. (degC) | For thermal demagnetization, the temperature step at which the first jump in magnetic susceptibility occurs. A jump is defined as a susceptibility of at least 2.5 times the previous value. |
| Steps | Number of treatment steps for this sample |
| PCA dec. (deg) | Declination of PCA direction (°) |
| PCA inc. (deg) | Inclination of PCA direction (°) |
| PCA MAD1 | The Maximum Angle of Deviation for the planar PCA fit; the smaller the value, the more coplanar the points. See section 4.3.1 for more details. |
| PCA MAD3 | The Maximum Angle of Deviation for the linear PCA fit; the smaller the value, the more collinear the points. See section 4.3.1 for more details. |
| PCA anchored | ‘Y’ if the PCA fit was anchored; ‘N’ if not |
| PCA equation | The Cartesian equation of the PCA best-fit line |
| PCA start (degC or mT) | Field (in mT) or temperature (in °C) of first demagnetization step used for PCA analysis |
| PCA end (degC or mT) | Field (in mT) or temperature (in °C) of last demagnetization step used for PCA analysis |
| PCA contiguous | ‘Y’ if all steps between the first and last were selected for PCA; ‘N’ if any were omitted |
| GC dec (deg) | the declination of the pole to the fitted great circle, if any |
| GC inc (deg) | the inclination of the pole to the fitted great circle, if any |
| GC strike (deg) | the strike of the plane of the fitted great circle, if any |
| GC dip (deg) | the dip of the plane of the fitted great circle, if any |
| GC MAD1 | the MAD1 value for the great circle fit, indicating goodness of fit (smaller is better). See section 4.3.1 for more details. |
| GC npoints | the number of points used for the great-circle fit |
| MDF half-intensity (A/m) | half of the NRM (in A/m) |
| MDF demagnetization (degC or mT) | the treatment level at which the intensity of the sample’s remanence was reduced to half the NRM (in °C or mT). If half-intensity was not reached, this column contains 0. |
| MDF midpoint reached | ‘Y’ if magnetization intensity reached half the NRM intensity during demagnetization; ‘N’ otherwise |
| Fisher dec. | Mean declination of treatment step directions (°) |
| Fisher inc. | Mean inclination of treatment step directions (°) |
| Fisher a95 | α95 of mean treatment step direction (°) |
| Fisher k | k-value of mean treatment step direction |
| Fisher nDirs | number of directions used to calculate mean |
| Fisher R | length of sum of directions used to calculate mean |
| AMS dec1 | declination of major axis of AMS tensor |
| AMS inc1 | inclination of major axis of AMS tensor |
| AMS dec2 | declination of intermediate axis of AMS tensor |
| AMS inc2 | inclination of intermediate axis of AMS tensor |
| AMS dec3 | declination of minor axis of AMS tensor |
| AMS inc3 | inclination of minor axis of AMS tensor |
| Initial MS | magnetic susceptibility at the first treatment step |
| [annotations] | Any user-defined annotations are also exported as part of the sample export file. See section 4.5 for details. |
saves a file containing (for suites with discrete samples) all the data associated with sites. Table 3 describes the fields which make up this file.
| Field name | Description |
| Site | Name of site |
| Samples | Number of samples at this site |
| Fisher dec. | Mean declination of sample directions (°) |
| Fisher inc. | Mean inclination of sample directions (°) |
| Fisher a95 | α95 of mean sample direction (°) |
| Fisher k | k-value of mean sample direction |
| Fisher nDirs | number of directions used to calculate site mean |
| Fisher R | length of sum of unit direction vectors |
| GC valid | ‘Y’ if the great-circle fit is valid, ‘N’ otherwise. See section 4.4.4 for details on the validity test and how it may be customized. |
| GC dec. (deg) | Declination of great-circle direction (°) |
| GC inc. (deg) | Inclination of great-circle direction (°) |
| GC a95 (deg) | α95 for great-circle direction (°) |
| GC k | k-value for great-circle direction |
| GC N | Number of great circles used in great-circle fit |
| GC M | Number of PCA directions used in great-circle fit |
| GC R | length of sum of direction vectors in great-circle fit |
| GC min points | the smallest number of treatment steps used to define any of the great circles fitted at this site |
| T1min | See note below |
| T1max | See note below |
| T2min | See note below |
| T2max | See note below |
| Lat (deg) | Site latitude |
| Long (deg) | Site longitude |
| VGP lat (deg) | VGP latitude |
| VGP long (deg) | VGP longitude |
| VGP dp (deg) | dp, the first semi-axis of the VGP confidence ellipse |
| VGP dm (deg) | dm, the second semi-axis of the VGP confidence ellipse |
Note on T1min, T1max, T2min, and T2max: these four parameters give the ranges of demagnetization steps used to fit the circles. T1 denotes the first (lowest) demagnetization step in a circle path for an individual sample, and T2 the last (highest). T1min is the minimum of the T1 values across all the circles for the site, and T1max the maximum. Similarly, T2 denotes the last step used in a single circle, and T2min–T2max is the range of its values across all the samples at a site.
____________________________________________________________________________
saves a CSV file containing the Fisherian parameters for mean directions calculated across the entire suite; see the documentation for the Calculate → Suite means menu item (section 4.1.3) for details.
saves a CSV file containing the Fisherian parameters for mean directions calculated across all the currently open suites; see the documentation for the Calculate → Multi-suite means menu item (section 4.1.3) for details.
saves files containing IRM acquisition data. It produces a folder of files, one for each sample in the suite. Each file is in tab-delimited text format, and each line within the file contains the IRM field strength and the magnetization intensity of the sample after application of that field.
creates a data bundle from the current suite. This is a zip archive containing the suite data and analysis parameters, calculation results, and other files useful for exploring or reproducing the results. Data bundles are described in more detail in Section 4.9.
is a submenu with various options for exporting the plots for the current and selected samples. See section 4.6 for full details.
is a submenu with functions to import additional data into the current suite.
reads a palaeomgnetic data file, like the Open… function in the main File menu. The difference is that this function will append the data to the current suite, rather than creating a new suite for it.
imports co-ordinates (latitude and longitude) for sites in the suite. These co-ordinates are used to calculate virtual geomagnetic poles from site directions. The location file should be in CSV (comma-separated value) format with no header line. Column 1 contains the site name, column 2 the latitude (degrees north from equator, negative for southern hemisphere), and column 3 the longitude (degrees east of Greenwich).
imports AMS data from a file and adds it to the current suite. The file must be in the .ASC format produced by the SAFYR and SUSAR programs distributed with AGICO kappabridges. (AMS import has been tested with data from SAFYR versions 1.5 and 2.6 and SUSAR version 4.0.) The AMS data is assigned to the appropriate samples within the suite by matching the sample names specified in the ASC file with the sample names for the demagnetization data. If the AMS file contains data for samples not in the suite, these samples will be created and added to the suite. PuffinPlot reads the sample correction from the ASC file; it also reads the F1 (‘foliation 1’) orientation and uses it as the formation correction. If ASC data is being imported for existing samples, you can choose either to keep the pre-existing sample and formation corrections, or to replace one or both of them with the values read from the ASC file. AMS data is not displayed by default; the equal-area plot of AMS data can be activated from the Preferences window.
opens a window allowing you to change the paper size, orientation, and margins for printing.
opens a window allowing you to print the selected samples. Note that only the selected samples will be printed, so if you wish to print the whole suite use Edit → Select all first. On most systems this will also allow you to print to a PDF file; Windows users may need to install a virtual PDF printer, such as CutePDF Writer or Bullzip PDF Printer, in order to produce PDF files.
prints the contents of a separate window showing an equal-are plot of sample/site directions through the suite; see section 4.1.4 for more details.
prints the contents of a separate window showing an equal-area plot of directions at the current site; see section 4.1.4 for more details.
runs a user-specified external script written in the JavaScript programming language. See section 4.8 for details.
runs a user-specified external script written in the Python programming language. See section 4.8 for details.
opens the preferences window. See section 4.4 for details. On Mac OS X, this item is found on the PuffinPlot menu to the left of the File menu, rather than on the File menu.
terminates PuffinPlot. On Mac OS X, this item is found on the PuffinPlot menu to the left of the File menu, rather than on the File menu.
The Edit menu contains functions related to the manipulation of data.
allows you to reposition and resize the plots in the main display area. See section 4.3.2 for details.
resets the sizes and positions of all the plots to their default values.
is a submenu containing editing functions related to treatment steps within a sample.
selects all the treatment steps in all the selected samples, excluding treatment steps which have been hidden (see Hide steps below).
de-selects all the treatment steps in all the selected samples.
copies the selected treatment steps for the current sample to an invisible ‘clipboard’. The selection can be pasted from the clipboard to other samples (see Paste point selection), selecting the same demagnetization steps in those samples. This is useful for selecting the same treatment steps in a large number of samples without having to manually select them for each sample.
takes the selected treatment steps from the clipboard (see Copy step selection) and selects the corresponding treatment steps in all the selected samples.
hides all the selected treatment steps in all the selected samples. This removes them from all the graphical plots (which will be rescaled to avoid unnecessary blank space), but not from the data table in the main plot window; on the data table, hidden treatment steps are marked with a dash symbol (–) to their left. Hidden steps can be restored using the Show all steps menu item.
restores all hidden treatment steps in all the selected samples.
A treatment step is considered a duplicate of another if they are both in the same sample and have the same treatment type and level. This function will replace each group of duplicate steps within the selected samples with a single step. The magnetic moment of the replacement step is calculated as the arithmetic mean of the moments of the duplicate steps. Other treatment step data, such as magnetic susceptibility, is taken from the first step in each group of duplicates.
is a submenu containing editing functions related to whole samples.
opens a window which allows you to change the sample volume, sample orientation, formation orientation, and local magnetic declination for all the selected samples. Each parameter type can be individually changed without affecting the values of the others. For convenience, sample orientation can be specified using either dip angle or hade; it is possible but pointless to enter values for both of these parameters, since one will overwrite the other. Similarly, formation orientation can be specified using either dip azimuth or strike.
opens a window which allows you to change the treatment type for the selected samples. Normally, the treatment type will be automatically determined on opening a data file. If the file does not specify the treatment type, PuffinPlot will attempt to guess it. Set treatment type allows you to set the treatment type explicitly in cases where PuffinPlot guesses wrong, or where the wrong treatment type is given in the data file.
is a submenu allowing the demagnetization data from the selected samples to be rotated 180° around a selected axis. Such functionality is rarely required but can be useful, for example, when it is found that a sample has been incorrectly oriented during measurement, or when converting between different orientation conventions.
rotates the magnetic moment values for all selected samples 180° around the X axis.
rotates the magnetic moment values for all selected samples 180° around the Y axis.
rotates the magnetic moment values for all selected samples 180° around the Z axis.
Inverts every magnetization vector in every selected sample. (Each of the x, y, and z co-ordinates of each vector is negated; this corresponds to a point reflection through the origin.)
operates on continuous suites made up of core sections with no absolute azimuthal alignment. The alignment is carried out using PCA directions, which must be calculated before carrying out the alignment. The top core section is rotated so that the PCA direction at the top aligns with a specified reference direction; for each core section below the top section, the section is rotated so that the PCA direction at its top aligns with the PCA direction at the bottom of the core section above it. The number of samples averaged at the core ends to produce the ‘top’ and ‘bottom’ directions can be specified.
removes from the current suite all the samples outside a specified depth range.
removes from the current suite all the selected samples with a specified treatment type. A sample will be removed if any of its treatment steps is of the specified type.
combines any selected samples that have the same name or depth. Each merged sample will contain all the treatment steps in all the duplicate samples; if any of the treatment steps are duplicated, they will be merged as described for the Merge duplicate treatment steps function.
scales all the magnetic susceptibility values for the suite by a specified factor. This is useful since magnetic susceptibility meters typically do not report values in standard S.I. units. Note that, unlike many PuffinPlot operations, the scaling is applied to the entire suite, not just the selected samples.
is a submenu allowing site names to be modified for samples in various ways.
allows a single site name to be set for all the selected samples.
sets site names for the selected samples by taking specified characters from the sample names. The characters to use are specified by a list of comma-separated numbers and number ranges; for example, entering 1,3,5-8 would give each selected sample a site name composed of the first, third, and fifth to eighth characters of the sample name, so that a sample with the name FFQB0529.1 would get the site name FQ0529. The table below gives some further examples.
| Sample name | Character selection | Resulting site name |
| FFQB0529.1 | 1,3,5-8 | FQ0529 |
| FFQB0529.1 | 4-6 | B05 |
| CiLpA-10-53 | 1-2,5,7-8 | CiA10 |
| CiLpA-10-53 | 3-4,9-11 | Lp-53 |
sets site names in continuous suites using the depths of the individual samples. PuffinPlot asks for a thickness value, and groups the samples within the core into sites of that thickness, effectively ‘slicing’ the core into equally thick sites. Each site is named after the shallowest depth within it.
removes all site names in the current suite.
is a submenu of functions which affect the whole suite.
allows you to add or remove user-defined flags for the suite; see section 4.5 for details.
allows you to add or remove user-defined note categories for the suite; see section 4.5 for details.
lets you convert a discrete suite to a continuous one by replacing each sample name with an associated depth. Selecting this item brings up a dialog which lets you choose a CSV file to open. The CSV file must consist of two columns. The first column contains sample names, and the second column contains the associated depths. The CSV file must contain a row for every sample in the suite.
The calculations menu provides facilities for calculating magnetic parameters and directions. Note that most calculations operate on all the selected samples, not just the current sample.
calculates a best-fitting line to all the selected points in all the selected samples, using principal component analysis (Kirschvink, 1980). The PCA direction is projected onto the Zijderveld plot. If the ‘PCA anchored’ menu item (below) is ticked, the resulting PCA fit line will be anchored to the origin; if ‘PCA anchored’ is not ticked, the PCA fit will be unanchored.
is a menu item which may be toggled on or off. When it is on, a tick mark appears next to it, and PCA analyses are constrained to pass through the origin. In general, it is appropriate to anchor the PCA if the analysed points are known to represent the final demagnetization component – that is, they are trending directly towards the origin, and deviations from this path are known to be due to measurement noise rather than an offset in the true magnetization vectors. Leaving PCA unanchored allows analysis of a non-final component, provided that it is sufficiently well separated from other components.
calculates a Fisherian mean direction for each selected site using the PCA directions of its samples.
calculates a direction for each selected sample using the Fisherian mean of the directions for the selected treatment steps. PCA is almost always preferable for establishing a reliable sample direction, but this technique can sometimes be useful for determining a polarity from very noisy data. Note that, at present, Fisherian sample directions are not saved as part of the PuffinPlot file, although they can easily be recalculated if the selected demagnetization points are not changed. The Fisherian mean and associated parameters are, however, included in exported sample data files (see Table 2).
calculates Fisherian means across all the selected samples. Two sets of means are actually calculated: one set is calculated from the PCA directions of individual samples, and the other from the site mean directions (if any have been computed). Note that, if there are site means computed by great-circle intersection, only those considered valid are used; see section 4.4.4 for details of the validity test. If a site has both a valid great-circle direction and a Fisherian direction calculated from PCAs, the great-circle direction will be used. Each set of means consists of an overall mean and individual means for the upper and lower hemisphere, to cater for data sets containing reversals. Corresponding VGPs are also calculated. All these means can be exported as a CSV file using the File → Export Data → Export suite calculations… menu item. The overall means and VGPs (but not the individual upper/lower hemisphere means) are also shown in the Suite table plot if it is active. Note that (like most PuffinPlot functions) this feature operates on all the selected samples; to calculate means for the entire suite you must first select all the samples.
calculates the Median Destructive Field (or, for thermal demagnetization, the Median Destructive Temperature) of the selected samples. This is the field (or temperature) at which the intensity of the sample’s remanence has been reduced to half of its initial value. Once calculated, it is displayed on the demagnetization-intensity plot, and can be saved as part of the exported sample data. If the sample never reaches half-intensity during treatment, the MDF is undefined; in this case, it is not shown on the plot, and an MDF value of 0 is used in the exported sample data file.
de-selects all the points in all the selected samples, and clears the results of any calculations done on them, such as PCA or great-circle analysis.
clears any PCA calculations for the currently selected samples.
clears any great-circle fits on them for the currently selected samples.
calculates and displays a best-fitting great circle for all the selected points in all the selected samples.
calculates a best-fitting direction for all the great circles fitted at the sites corresponding to the currently selected samples, using the algorithm of McFadden and McElhinny (1988). For any sample which has a PCA direction but no fitted great circle, the PCA direction will be used as an endpoint. The great-circle fit is shown both in the Equal-area (site) plot in the main window (if the plot has been activated in the preferences), and in a separate window which is opened automatically.
clears the results of any calculations associated with the selected sites (as opposed to samples); at present, this amounts to clearing the best-fit great-circle direction for each selected site.
calculates Fisherian means across all the samples in all the currently opened suites. the results are not plotted, but they are shown in a pop-up window and can be saved using the File → Export data → Export multi-suite calculations… menu item.
is a submenu containing various functions for AMS calculation. PuffinPlot can show the results of statistical calculations on AMS tensors, giving mean directions and confidence ellipses for the principal axes by one of three methods; at present, however, these calculations cannot be performed by PuffinPlot itself. Instead, it makes use of two Python scripts from the PmagPy suite (Tauxe et al., 2010), bootams.py and s_hext.py. In order to calculate AMS statistics, these scripts must first be installed on the computer running PuffinPlot, and the folder containing them must be specified in the Preferences window. The PmagPy programs may be obtained from http://earthref.org/PMagPy/. All AMS calculations operate on the currently selected samples, except for Clear AMS, which operates on the entire suite. Tauxe et al. (1998) and chapter 13 of Tauxe et al. (2010) give more details of tensor statistics, particularly with regard to the application of bootstrap methods.
calculates bootstrap statistics using the bootams.py program, producing Kent error ellipses which are shown on the AMS plot in the main window.
calculates bootstrap statistics using the bootams.py program, producing Kent error ellipses which are shown on the AMS plot. It differs from the previous function in employing a parametric bootstrap, which can provide more realistic confidence intervals for small numbers of samples on the (often reasonable) assumption that measurement uncertainties are normally distributed across the selected samples.
calculates Hext (1963) statistics using the s_hext.py program and displays the mean directions and error ellipses on the AMS plot.
Clears any previously done bootstrap and Hext calculations.
calculates relative palaeointensity using two open suites. One suite provides the NRM, the other provides the normalizing value from ARM or magnetic susceptibility. RPI calculations are saved directly to a CSV file; the RPI estimate can also be shown in the RPI plot.
This menu allows you to open or close auxiliary windows.
opens (or closes) a window showing all the demagnetization data for the current sample as a table. This table is far more extensive than the brief table displayed in the main window, and allows data to be selected and copied to the clipboard so that it can be pasted into a spreadsheet or text editor.
opens (or closes) a window containing an equal-area plot for the current site; the plot is created by selecting the Calculations → Fisher by site or Calculations → Great circles menu items, and may be printed using the File → Print site EA window… menu item. Note that the main display area provides a similar plot; this window can be useful for a quick inspection of site data at a larger scale without editing the main plot layout.
opens (or closes) a window containing an equal-area plot of sample or site directions across the whole suite; the plot is created by selecting the Calculations → Suite means menu item, and may be printed using the File → Print suite EA window… menu item. Note that the main display area provides a similar plot; this window can be useful for a quick inspection of suite data at a larger scale without editing the main plot layout.
opens the PuffinPlot website using the default web browser.
opens a window containing information on the PuffinPlot paper (Lurcock and Wilson, 2012) and how to cite it.
displays some brief information about PuffinPlot, including the version. On Mac OS X, this item is also present on the PuffinPlot menu.
This section presents PuffinPlot’s features in moderate detail.
PuffinPlot can read a number of commonly used palaeomagnetic data formats:
Note that there are different ways to read 2G data files: users are encouraged to read section 4.4.2 and ensure that the preferences are correctly set for their needs. (In particular, magnetization vectors may be read incorrectly from 2G long core files if the wrong import settings are used, so it is important to check the settings before importing data.)
In general, support for other file formats is straighforward to add, and most tabular textual file formats can be opened using the File → Import data… function.
When you open a file and select the Custom format filetype, PuffinPlot opens a dialog box allowing you to describe a text-based, tabular file format; once you have specified a format, you can choose one or more files in that format, which PuffinPlot will then open. The file is assumed to contain one magnetic measurement per line. The file format specification consists of two parts: General settings and Column definitions.
General settings
This part describes parameters relating to the file as a whole, rather than individual columns.
Column definitions
This part gives the column number for each item of measurement data to be read.
For most of PuffinPlot’s functions, the data points of interest must be selected before anything can be done to them. You can select data points simply by clicking on them; if you click on a selected point it will be de-selected. Selected points are drawn in red to distinguish them from the black unselected points. Note that the notional data point itself is the thing being selected, not the visual representation that you click on. Thus, if you click on a point in one plot, the corresponding point in all the visible plots will also turn red, since they are visual representations of the same treatmentStep.
Since data points are relatively small, clicking accurately on them can be inconvenient. PuffinPlot offers two alternative selection methods to alleviate this problem. Firstly, by holding down the Shift key, you can select a point simply by left-clicking near it; holding Shift and right-clicking will de-select nearby points instead. Secondly, you can left-click, hold the button, and drag the pointer across the graph, creating a rectangle. Every point within the rectangle will be selected. Dragging a rectangle with the right button will instead de-select every point within the rectangle.
Since most PuffinPlot operations are automatically applied to all the selected samples, repetitive analysis work can often be done automatically using the Copy point selection feature. For example, if you wish to apply a PCA to the 100–250°C demagnetization range of a series of 50 samples, it can be done in four quick steps:
This will immediately perform PCA on all 50 selected samples.
This section lists and briefly describes the available plot types in PuffinPlot. Some of them are not displayed by default, but these may be activated via the preferences window (see section 4.4). Note that the term ‘plot’ is used rather loosely in this manual to refer to any movable element displaying data within the main window. Thus, the ‘plots’ listed below include textual elements such as legends and tables.
is a lower-hemisphere equal-area plot of AMS data, if any has been imported. Maximum, intermediate, and minimum anisotropy axes are shown as squares, triangles, and circles respectively. If AMS statistics have been calculated (see section 4.1.3), the mean directions and confidence ellipses are also shown.
is a table in which each row represents one demagnetization step for the current sample. The columns, from left to right, give the demagnetization step, declination, inclination, intensity, and magnetic susceptibility. Selected points are denoted by an asterisk (*) to their left; hidden points are denoted by a dash (–) to their left.
is a plot of treatment level (in mT or °C) versus intensity of magnetization (in A/m), shown as a line of filled points. If magnetic susceptibility measurements have been taken, they are overlaid on the same plot as unfilled points, with the scale shown on the right of the graph. If PuffinPlot cannot find any data describing the demagnetization treatment (i.e. AF field strength or temperature), the X axis will be labelled ‘measurement number’, and the X values will correspond to the sequence of the data in the file.
is a Lambert azimuthal equal-area projection showing the directions of the current sample’s magnetization vectors. Successive points are connected by great-circle segments. Points in the upper hemisphere are shown as unfilled (white) and connected by solid lines; points in the lower hemisphere are filled (black) and connected by dashed lines. If a great circle fit has been calculated for the sample, it is shown on this plot, and the pole to the great circle is shown as a triangle.
shows all the great circles fitted at the current sample’s site, along with a best-fit direction calculated by the method of McFadden and McElhinny (1988). On this plot, the calculated site direction is shown as a circle. Any sample PCA directions are shown as diamonds. Demagnetization steps used for the great-circle fits are shown as squares. Poles to the great circles are shown as triangles.
shows all the site means for the suite, and a Fisherian mean and 95% confidence interval for them. If two polarities are present in the suite, two means are calculated and shown. If no sites are defined, individual sample PCA directions and their means are plotted instead. Note that, for site means calculated by great-circle analysis, only valid means are shown. See section 4.4.4 for details on how validity is determined.
shows a histogram of NRM intensities across the whole suite.
plots the current RPI estimate (if any) against depth.
shows the results of PCA and/or great-circle fits for data in the current sample. If neither of these calculations has been done, this plot is invisible. When visible, it shows the inclination and declination of the first principal component, which corresponds to a least-squares linear fit. It also shows the maximum angular deviation (MAD) values MAD1 and MAD3, which function as goodness-of-fit parameters (smaller is better). The MAD1 value gives an indication of how nearly the points lie in a single plane; the MAD3 value gives an indication of how nearly they lie along a single line. PCA analysis and MAD values are explained in Kirschvink (1980) and in section 9.7 of Tauxe et al. (2010). The plot also show the Cartesian equation of the PCA best-fit line. For the great-circle fit, the plot gives the inclination and declination of one of the great circle’s poles, and the MAD1 value indicating the goodness of fit of the great circle. (Note that this may be different from the MAD1 for the PCA fit, since different sets of points may be used for the two fits.)
shows a summary of parameters for each sample within the current site: declination, inclination, and type of analysis (‘PCAa’ and ‘PCAu’ for anchored and unanchored PCA respectively, and ‘GC’ for great circle). For PCA analysis, the declination and inclination give the first principal component; for great-circle analysis, they give the pole to the circle. Clicking on a line within this table will show the corresponding sample’s data – in effect it works as an extra sample chooser. If no sites are defined, this table shows the sample parameters for the entire suite (or as many of them as will fit within the table’s current dimensions).
shows a summary of parameters for each site within the current suite. The columns are:
If both a valid great-circle direction and a Fisherian direction exist for a site, only the great-circle direction will be shown. Clicking on a line within the site parameter table will jump to the first sample of the corresponding site.
shows the site mean direction as calculated either by Fisher statistics or by the great-circle technique of McFadden and McElhinny (1988). It gives the mean inclination and declination and the α95 and k parameters. If no site mean direction has been calculated for the current site, this plot is invisible.
is a table showing suite-level mean direction and VGP data. See the entry on Site parameter table for explanations of the Fisher parameters associated with each mean direction. The directions shown are: ‘Site dir’, the mean direction calculated from site mean directions; ‘Sample dir’, the mean direction calculated from sample mean directions; ‘Site VGP’, the mean of the VGPs of sites; and ‘Sample VGP’, the mean of the VGPs corresponding to individual sample directions. As with most PuffinPlot operations, the parameters shown are calculated using only the samples and sites selected at the time the calculation is done.
is an experimental ternary plot designed to display data from triaxial IRM demagnetization experiments conducted according to the method of Lowrie (1990). The position of a point on the plot reflects the relative strengths of the three axes of magnetization, which in turn correspond to high, medium, and low coercivity components. The path produced by points at successive demagnetization steps thus shows the relative effects of thermal unblocking (and possibly thermal alteration) on these components.
shows the name of the current sample and the current site, for a discrete suite. For a continuous (long core) suite, it shows the current depth. This plot also shows suite-level Fisher statistics calculated over samples and over sites, if these are available (see the Calculate → Suite means function in section 4.1.3).
is a world map (using a Mollweide projection) showing the locations of virtual geomagnetic poles (VGPs) for each site in the current suite. VGPs can only be calculated for sites whose location has been set; See Import site locations… in Section 4.1.1 for details on reading site locations from a CSV file.
is a table showing virtual geomagnetic pole (VGP) data for each site in the current suite. The columns are: site name, ϕ (site latitude), λ (site longitude), VGP ϕ (VGP latitude), VGP λ (VGP longitude), dp (first semi-axis of VGP confidence ellipse), and dm (second semi-axis of VGP confidence ellipse). VGPs can only be calculated for sites whose location has been set; See Import site locations… in Section 4.1.1 for details on reading site locations from a CSV file.
is a Zijderveld plot, overlaying an orthographic projection in the horizontal plane with an orthographic projection in a chosen vertical plane. The vertical plane can be controlled using the chooser on the toolbar; see section 3.5.3 for details. The horizontal projection is shown with filled points, and the vertical projection with unfilled points. If a PCA fit has been calculated for this sample, the two projections of the PCA lines are overlaid on the plot in blue. (If the V vs. H vertical projection is selected, only the horizontal projection of the PCA line is shown, since V vs. H effectively uses a different vertical projection for each point.) The appearance of the PCA lines can be changed using the Preferences dialog (see section 4.4.4).
is a legend for the Zijderveld plot, showing the interpretations of the filled and unfilled points and giving the units in which the axes are calibrated.
PuffinPlot allows the plots to be freely rearranged and resized within the display area; they can also be switched on and off as required (see section 4.4). To arrange the plots, select Edit layout from the Edit menu. This puts PuffinPlot temporarily into a special mode where plots become moveable. A tick appears next to the menu item, and the plots are overlaid by pale orange rectangles, allowing you to manipulate them. Each plot is also annotated with its name, which helps to identify plots that are not currently displaying any data (e.g. the ‘PCA directions’ display if no PCA has been performed). To resize a plot, click and hold on an edge or corner of its rectangle, then drag it to the desired size. To move a plot, click and hold in its central area and drag it to the desired location. Plots may be overlapped freely. When you click in an area where two or more plots overlap, the smallest plot is treated as the ‘topmost’, and this is the one which will be moved or resized.
Once the plots are arranged to your satisfaction, click Edit layout on the Edit menu again to untick the menu item and resume normal operation.
The plot layout is saved with your other preferences, and will be retained if PuffinPlot is closed and restarted. You can restore the original layout using the Reset layout menu item.
Sometimes it can be useful to save and restore different plot layouts. This can be done using the Export preferences… and Import preferences… menu items (see section 4.1.1).
The preferences window is divided into three tabs, with four action buttons at the bottom.
clears all changed preferences, resetting them to their default values.
sets your preferences from a file saved using Export preferences. See the description of Export preferences for details.
saves your current preferences to a file. In conjunction with the Import preferences feature, this allows you to transfer your preferences from one computer to another. It also allows you to keep multiple sets of preferences and switch between them as needed. Probably the most useful application is to save different plot layouts for different sets of data.
closes the Preferences window.
This tab contains options connected with reading data from .DAT files produced by the 2G ‘Long Core’ software.
This setting controls whether PuffinPlot reads a sample’s magnetic moment from the fields giving the Cartesian components of the magnetization vector (X/Y/Z) or whether it reads the polar represantation (the declination, inclination, and intensity fields). The Cartesian components are stored to higher precision in the file, so using them is preferable when possible. However, if the Cartesian components are used when reading a long-core file, they must usually be corrected for the effective sensor lengths (see below). If the sensor lengths are unknown, reading data from the polar fields can be a useful fallback. When reading a file using the ‘X/Y/Z’ setting, PuffinPlot first looks for the ‘X corr’, ‘Y corr’, and ‘Z corr’ fields to determine the magnetization vector. If these are not present, it falls back to ‘X mean’/‘Y mean’/‘Z mean’, then to ‘X intensity’/‘Y intensity’/‘Z intensity’.
As described above, the Cartesian magnetization components in long core files are not corrected for effective sensor length, which is determined by the response function of each SQUID and must be determined empirically when setting up the machine. To produce a magnetization vector for long core files when using the ‘X/Y/Z’ setting, PuffinPlot corrects the SQUID readings for these configured sensor lengths when opening the file.
gives the measurement protocol used in taking the readings. A protocol is a particular sequence of empty tray measurements and sample measurements in defined orientations, undertaken for each set of measured samples. The tray and sample measurements are combined by PuffinPlot as it reads the file, providing a more accurate, corrected moment measurement for each sample. (Magnetic susceptibility measurements, if present, are also automatically associated with the preceding magnetic moment measurement or measurements.) Table 4 describes the available protocols.
Warning: incorrectly set sensor lengths can produce erroneous data! The sensor lengths are not written to the 2G file, so they must be correctly set in PuffinPlot’s preferences before importing 2G long core data from the X/Y/Z vector components. (When importing discrete data, or reading from the polar fields in the 2G file, sensor lengths are not required.) If the sensor lengths are not known, use the ‘Dec/Inc/Intensity’ setting in the 2G import tab. Failing to correct for sensor length is particularly dangerous because the deviations from the correct vectors are often small enough not to be immediately obvious. See Section 3 of Roberts (2006) for a fuller discussion of sensor response functions.
| Protocol | Description |
| NORMAL | No extra tray or sample measurements are made. Each measurement run consists simply of measuring the samples once in their normal orientation. |
| TRAY_NORMAL | Before each sample-measurement run, an empty tray measurement run is made. The input file thus consists alternately of empty-tray lines and sample-measurement lines. Each tray measurement is used to correct the subsequent sample measurement. |
| NORMAL_TRAY | As TRAY_NORMAL, but the tray measurement is made after the sample measurement rather than before it. |
| TRAY_NORMAL_YFLIP | As TRAY_NORMAL, but adding an extra sample measurement as a third step. In the extra measurement, the sample is rotated 180° around its y axis, so that the x and z measurements are inverted. Combining these readings improves not only the precision but also the accuracy of the magnetic moments measured on the x and z axes, since any systematic bias should be cancelled out by the inversion. For the y axis, accuracy is not affected but precision is improved by averaging the two measurements. |
| TRAY_FIRST | This is the simplest tray correction: the tray is measured once at the start, and all subseuent measurements are sample measurements. PuffinPlot corrects each sample measurement using the initial tray measurement. |
| TRAY_NORMAL_IGNORE | This option reads a file measured using the TRAY_NORMAL protocol, but (like TRAY_FIRST) makes all sample corrections using the initial tray measurement, and ignores all subsequent tray measurements. The main intended use for this option is to allow direct comparison between the TRAY_FIRST and TRAY_NORMAL protocols, to avoid the extra work of using the TRAY_NORMAL protocol on sample suites for which it is unnecessary. |
This tab shows a list of plots which PuffinPlot can display. You can control which plots are shown by ticking and unticking the boxes next to the plot names. The plot types are detailed in section 4.3.1.
If this box is ticked, the equal-area plots (sample, site, suite, and AMS) will be shown with text labels at the bottom right, making them easier to distinguish from one another.
If this box is ticked, each point on the demagnetization plots (Zijderveld and equal-area) will be labelled with the appropriate treatment step (AF intensity or temperature).
If this box is ticked, sample directions (PCA or Fisher) will be labelled with the sample’s name or depth in the site equal-area plot.
If this box is ticked, sample and site directions will be labelled with the appropriate name or depth in the suite equal-area plot.
If this box is ticked, the current sample and site data will be shown in red on the site and suite equal-area plots and on the sample and site parameter tables. This feature makes it easier to pick out the current sample and site in the context of larger-scale analyses, and is useful for exploring data, particularly in conjunction with the ability to jump to a sample or site by clicking on its line in a parameter table.
If this box is ticked, any site direction shown on the suite equal-area plot will be plotted along with a projected small circle denoting the α95 interval. The site α95 circles are plotted in blue, to distinguish them from the suite α95s (plotted in black).
If this box is ticked, the bedding azimuth for formation orientation correction is assumed to be relative to magnetic north, and a correction is applied for local magnetic deviation. (The sample azimuth is always assumed to be relative to magnetic north; if it is relative to geographic north, a magnetic declination of zero can be specified.)
allows to you customize the text which labels the y axis of the demagnetization-intensity plot.
sets the location of the PmagPy programs. If you wish to do calculations of AMS statistics within PuffinPlot, it is necessary to have the PmagPy programs bootams.py and s_hext.py installed (see section 4.1.3 for details). This box allows you to specify to PuffinPlot the folder in which the programs are installed.
allows you to change the font used in the plots: enter a font family name into the box. PuffinPlot must be restarted for the change to take effect. If the specified font cannot be found, a default fallback font is used.
controls the appearance of PuffinPlot’s windows and menus. (It has no effect on the functionality of the program.) Native gives an appearance intended to harmonize with other programs on the operating system on which PuffinPlot is running. Metal and Nimbus are cross-platform appearances which will look the same on any operating system. Default will use the default appearance for Java programs on the current operating system; in most cases this will be the same as Native for Mac OS X and Windows, and Metal for Linux. Changes to this option will not take effect until PuffinPlot is restarted.
allows you to customize the conditions under which a site mean calculated by great-circle intersection is considered valid. The validity test is used in several ways:
The validity test takes the form of a logical expression in the syntax of the JavaScript programming language, involving the following variables:
The most useful components for constructing validity expressions are the comparison operators <, <=, >=, >, the logical operators && and || (corresponding to ‘and’ and ‘or’ respectively), and parentheses. A typical expression might be
which means that a great-circle fit will be considered valid if it has an α95 below 3, a k above five, and either at least three endpoints or at least five circles. The default value of this setting is true, which causes all great-circle fits to be considered valid. If there is an error in the expression (i.e. if it isn’t a valid JavaScript expression, or if it doesn’t produce a true/false value), it will be evaluated as false.
controls the manner in which PCA directions are shown on the Zijderveld plot (see section 4.3.1). The available settings are:
controls how sample orientation is displayed at the top of the main window: it can be shown either as azimuth and dip angle, or as azimuth and hade (the complement of the dip angle).
controls how formation orientation is displayed at the top of the main window: it can be shown either as dip azimuth and dip angle, or as strike and dip angle.
Annotations are a feature allowing short, categorized notes to be added to each sample in a suite. The categories can be freely chosen. Annotations come in two varieties, custom flags and custom notes. Custom flags embody a true/false value and are intended to record whether a sample fulfils some criterion – for example, ‘messy’, ‘low-temperature alteration’, or ‘multiple components’. Custom notes are intended for adding short items of information which are not automatically inferred by PuffinPlot – for example, ‘number of components’ or ‘behaviour type’.
Adding annotation categories
Annotations categories defined by selecting the Edit custom flags… or Edit custom notes… item from the Edit menu. This will show a window allowing you to add, rearrange, or remove the annotation categories. If an annotation category is removed, all annotations made within that category will be lost.
Using annotations
When custom flags or notes have been defined, an extra panel appears at the right-hand side of the main window. For each custom note category there is a text box into which text may be typed. For each custom flag category there is a tick box which may be selected or de-selected.
Annotations are saved with the rest of the data in the PuffinPlot file; they are also exported in the sample data CSV file produced by the File → Export data → Export sample calculations menu item.
PuffinPlot can export the displayed plots in several ways, for printing, incorporation into documents, and editing by other programs. Two formats are supported:
Both these formats are formally standardized; however, they are also large and complex, and they are supported to varying extents by a huge number of programs. For these reasons, compatibility problems can sometimes occur. It is difficult to produce a file which will be guaranteed to work well with any program on any operating system. PuffinPlot attempts to mitigate this problem by offering a range of different graphics export options, as detailed in the next section.
All of these export functions may be found in the Export graphics submenu of the File menu, except for the ‘Print to PDF’ option.
These options are to some extent redundant: SVG files produced using the two menu items should appear practically identical, as should the three varieties of PDF file. However, the internal structures of the files are different, which is useful in improving compatibility with other programs. If, for example, you find that another program has trouble reading the SVG file produced using the Batik option, you may find that if FreeHEP option produces better results.
In addition to its graphical user interface, PuffinPlot has a simple command line interface, allowing some operations to be performed from a text-based console or automated script. In summary, PuffinPlot’s available command-line arguments are:
PuffinPlot’s graphical desktop interface is intended to be the primary way to interact with the program. However, it is often useful to be able to control a program using a scripting language, in order to extend its capabilities, integrate it conveniently with other programs, or process large amounts of data without manual intervention. The Java platform upon which PuffinPlot is built supports a number of scripting languages which can easily interface with PuffinPlot. Perhaps most usefully, an implementation of the Python programming language – named Jython (Juneau et al., 2009) – has been developed for the Java platform. Since Python is widely used in scientific programming and scripting, and familiar to a large number of scientists, this provides a convenient route for anyone wishing to integrate PuffinPlot with other data processing steps. Using Jython, PuffinPlot can be controlled either from a pre-written script, or interactively from a command shell which accepts and executes commands one at a time from the user. Jython scripts can also be run from within PuffinPlot itself, making it easy to perform scripted operations on currently open data suites. Jython is not distributed with PuffinPlot, but PuffinPlot will automatically download and install it the first time it is required. In addition to Python, PuffinPlot directly supports scripting in JavaScript.
Scripting allows you to extend the functionality of PuffinPlot without modifying the main program – for example, to perform extra processing on your data. It also allows you to reuse parts of PuffinPlot as a convenient library for other programs.
There are three basic ways to control PuffinPlot with scripting:
For the first two techniques – when the script is run by PuffinPlot itself – a variable called puffin_app is created, which represents the currently running instance of PuffinPlot. (When running a script directly from the command line, the -withapp argument must be specified to create this variable.) This variable can be used, for example, to gain access to any data already loaded into PuffinPlot.
Figure 3 shows a simple script demonstrating the use of PuffinPlot from within an external Jython interpreter (although it can also be run directly from within PuffinPlot). The script opens a data file, calculates the mean NRM, and produces a file containing a PCA direction for each sample. Note that virtually all of PuffinPlot’s data and functionality is available to the Python script, so far more complex examples are possible.
Internal documentation for PuffinPlot
To write scripts interacting with PuffinPlot, some knowledge of its internals is of course necessary. PuffinPlot comes with complete documentation (JavaDoc) for all its accessible data structures. If more detail is required, the source code is also freely available.
PuffinPlot can export a suite as a data bundle, intended mainly as an aid to reproducible research. It provides a straightforward way to package up all the relevant data and analysis parameters. Using the contents of a data bundle both the data and analysis techniques can be browsed in PuffinPlot, and calculation results can be reused as they are or regenerated from scratch. The data bundle is useful both for personal storage of research results, and for public archiving or distribution, for example as supporting material submitted with a manuscript for publication.
The data bundle is a zip archive containing the following files:
PuffinPlot files use a text-based format in UTF-8 encoding. The line separator is a single newline (character number 10). Fields within a line are separated by tabs (character number 9). At the time of writing, PuffinPlot uses version 3 of its file format. Versions 1 and 2 were only used in pre-release versions of PuffinPlot, and may therefore be safely ignored.
The main part of the PuffinPlot file is a sequence of lines containing treatment step data, one step to a line. The sequence of data fields is not fixed; rather, it is defined by a header line at the start of the treatment step section.
Treatment step fields are detailed in Table 5.
| Identifier | Type / Unit | Default | Description |
| DISCRETE_ID | string | UNSET | The discrete sample identifier (sample name). |
| DEPTH | unspecified | null | The depth of this sample in a core. Note that PuffinPlot does not assume any explicit unit for depth: any saved or exported data will simply use the same depth values without any attempt to interpret them in a unit system. |
| RUN_NUMBER | integer | −1 | The sequential number of the magnetometer run which measured this treatment step. |
| TIMESTAMP | string | UNSET | The time at which this measurement was made. PuffinPlot doesn’t process this field, so the format is undefined. |
| SLOT_NUMBER | integer | −1 | For discrete measurements on a multi-sample tray, the number of the tray slot containing the sample. |
| MEAS_TYPE | string | UNSET | Measurement type. Must be DISCRETE or CONTINUOUS. This field is required. |
| X_MOMENT | A/m | 0 | The x component of the sample’s magnetic dipole moment per unit volume in the uncorrected sample co-ordinate system. |
| Y_MOMENT | A/m | 0 | The y component of the sample’s magnetic dipole moment per unit volume in the uncorrected sample co-ordinate system. |
| Z_MOMENT | A/m | 0 | The z component of the sample’s magnetic dipole moment per unit volume in the uncorrected sample co-ordinate system. |
| MAG_SUS | unspecified | NaN | The sample’s magnetic susceptibility at this treatment step. PuffinPlot does not specify any unit for susceptibility and treats it as a relative value. |
| VOLUME | cm3 | 10.8 | The volume of a discrete sample. |
| AREA | cm2 | 4 | The cross-sectional area of a long core sample. |
| SAMPLE_AZ | ° | NaN | The azimuth (i.e. down-dip direction) of a sample’s field orientation. |
| SAMPLE_DIP | ° | NaN | The dip of a sample’s field orientation. |
| FORM_AZ | ° | NaN | The azimuth (i.e. down-dip direction) of the formation from which the sample was taken. |
| FORM_DIP | ° | NaN | The dip of the formation from which the sample was taken. |
| MAG_DEV | ° | 0 | The magnetic declination at the sampling site, i.e. the declination of the magnetic field direction relative to geographic north. |
| TREATMENT | string | UNKNOWN | The type of treatment applied to the sample. Must be one of NONE, DEGAUSS_XYZ, DEGAUSS_Z, ARM, IRM, or THERMAL. |
| AF_X | tesla | NaN | The x component of an alternating magnetic field treatment. |
| AF_Y | tesla | NaN | The y component of an alternating magnetic field treatment. |
| AF_Z | tesla | NaN | The z component of an alternating magnetic field treatment. |
| TEMPERATURE | °C | NaN | The peak temperature of a thermal treatment. |
| IRM_FIELD | tesla | NaN | The intensity of an applied IRM treatment. |
| ARM_FIELD | tesla | NaN | The intensity of the DC field in an ARM treatment. |
| ARM_AXIS | string | UNKNOWN | The axis along which an ARM was applied. Must be one of AXIAL, NONE, or UNKNOWN. |
| PP_SELECTED | boolean | false | Whether this step is selected in PuffinPlot. |
| PP_ANCHOR_PCA | boolean | false | Whether PCA calculations for this step should be anchored. |
| PP_HIDDEN | boolean | false | Whether this step is hidden in the PuffinPlot GUI. |
| PP_ONCIRCLE | boolean | false | Whether this step is included in great-circle fits. |
| PP_INPCA | boolean | false | Whether this step is included in PCA fits. |
The only required treatment step field in a PuffinPlot file is MEAS_TYPE. The minimal valid PuffinPlot file is thus:
PuffinPlot file. Version 3
MEAS_TYPE
(Here,  represents the newline character.) This file contains no lines beyond the header line, and
therefore no data. The minimal file containing data is:
represents the newline character.) This file contains no lines beyond the header line, and
therefore no data. The minimal file containing data is:
PuffinPlot file. Version 3
MEAS_TYPE
DISCRETE
This file contains a single treatment step, which specifies no data except that the sample is discrete. Loading this file into PuffinPlot will create a suite with a single discrete treatment step with all other fields set to their default values.
A suite line has SITE as the first field and follows one of the following formats:
(For convenience, fields are shown separated with spaces in this listing; in reality they are separated with tab characters.)
A site line has SITE as the first field and a site identifier string as the second field. The line follows one of the following formats:
(For convenience, fields are shown separated with spaces in this listing; in reality they are separated with tab characters.)
A sample line has SAMPLE as the first field and a sample identifier (discrete sample name or depth in a continuous core). The line follows one of the following formats:
(For convenience, fields are shown separated with spaces in this listing; in reality they are separated with tab characters.)
PuffinPlot makes use of several software libraries generously released under liberal terms:
PuffinPlot was created with the assistance of a cornucopia of free and open source software; among the more significant tools are the Java language and platform (along with many third-party Java libraries), NetBeans, Ant, Ivy, Emacs, LATEX (plus many LATEX packages), TeX4ht, the Gimp, and the Ubuntu operating system. I thank all who contributed to these projects.
PuffinPlot was initially developed at the Otago Palaeomagnetic Research Facility at the University of Otago, Dunedin, New Zealand. Several colleagues provided valuable testing and feedback during PuffinPlot’s early development; in particular I thank Christian Ohneiser, Faye Nelson, Claudio Tapia, and Bethany Fox for their time and effort. Further improvements were made during revision of the PuffinPlot paper, in response to thoughtful suggestions from Gary Acton and an anonymous reviewer. Since its initial release, PuffinPlot has benefited from bug reports and suggestions from Bill Phillips, Jonathan M. Glen, Fabio Florindo, Eric Horsman, Terence Day, Yoichi Usui, Adrian Muxworthy, Russ Burmester, Andrei Kosterov, Luca Lanci, Radchagrit Supakulopas, Cyril Okpoli, Bugra Cavdar, Jay Shah, Kuo-Hang Chen, Ashleigh Murszewski, Robert Coe, Ana Paula de Martini de Souza, Sébastien Wouters, and many others.
PuffinPlot’s icon, and the frontispiece for this manual, are from an illustration by the Finnish artist Wilhelm von Wright (1810–1887), published in Svenska fåglar, efter naturen och på sten ritade (2nd ed., 1929).
PuffinPlot continues to be developed, albeit slowly and sporadically now that its main functionality is complete and stable. Bugs in existing functionality are fixed as quickly as possible when they are reported, and new features are added as time permits. The PuffinPlot project, including downloadable packages of all released versions and the complete source code, is hosted at http://talvi.net/puffinplot. Bug reports, feature suggestions, and feedback of all kinds are always very welcome. Please send them to puffinplot@gmail.com.
If you are reporting a bug, please be as specific and detailed as you can. Try to include as many as possible of the following:
The more detail you include, the easier it will be to find and fix the bug quickly.
PuffinPlot was introduced and described in a 2012 paper published in Geochemistry, Geophysics, Geosystems. If you make use of PuffinPlot in published work, please include the following citation:
Lurcock, P. C., and G. S. Wilson (2012), PuffinPlot: A versatile, user-friendly program for paleomagnetic analysis, Geochemistry, Geophysics, Geosystems, 13, Q06Z45, doi:10.1029/2012GC004098.
The PuffinPlot paper is open access, and can be read online or downloaded by visiting http://dx.doi.org/10.1029/2012GC004098. A PDF of the paper can also be downloaded directly from the Otago University research archive at https://ourarchive.otago.ac.nz/bitstream/handle/10523/3651/2012GC004098.pdf.
For convenience, citation data is provided below in two formats commonly used by bibliography management software.
This is a minor release which fixes some bugs in version 1.4 and adds two new plot types.
The release numbering scheme changed with the 1.4 release: 1.4 is the immediate successor of 1.03.
No release notes are available for PuffinPlot versions prior to 1.03.
Butler, R. F. (1992). Paleomagnetism: Magnetic Domains to Geologic Terranes. Blackwell Scientific, Oxford.
Fisher, R. (1953). Dispersion on a sphere. Proceedings of the Royal Society of London. Series A, Mathematical and Physical Sciences, 217:295–305.
Hext, G. R. (1963). The estimation of second-order tensors, with related tests and designs. Biometrika, 50(3-4):353–373. Available from: http://biomet.oxfordjournals.org/content/50/3-_4/353.abstract.
Jones, C. H. (2002). User-driven integrated software lives: “Paleomag” paleomagnetics analysis on the Macintosh. Computers & Geosciences, 28:1145–1151.
Juneau, J., Baker, J., Munoz, L. S., Wierzbicki, F., and Ng, V. (2009). The Definitive Guide to Jython. Apress, New York.
Kirschvink, J. L. (1980). The least-squares line and plane and the analysis of palaeomagnetic data. Geophysical Journal of the Royal Astronomical Society, 62(3):699–718.
Lowrie, W. (1990). Identification of ferromagnetic minerals in a rock by coercivity and unblocking temperature properties. Geophysical Research Letters, 17(2):159–162. Available from: http://dx.doi.org/10.1029/GL017i002p00159.
Lurcock, P. C. and Wilson, G. S. (2012). Puffinplot: A versatile, user-friendly program for paleomagnetic analysis. Geochemistry, Geophysics, Geosystems, 13:Q06Z45. Available from: http://dx.doi.org/10.1029/2012GC004098.
McFadden, P. L. and McElhinny, M. W. (1988). The combined analysis of remagnetization circles and direct observations in palaeomagnetism. Earth and Planetary Science Letters, 87:161–172.
Roberts, A. P. (2006). High-resolution magnetic analysis of sediment cores: Strengths, limitations and strategies for maximizing the value of long-core magnetic data. Physics of the Earth and Planetary Interiors, 156(3–4):162 – 178.
Tauxe, L., Butler, R. F., Banerjee, S. K., and Van der Voo, R. (2010). Essentials of paleomagnetism. University of California Press, Berkeley.
Tauxe, L., Gee, J. S., and Staudigel, H. (1998). Flow directions in dikes from anisotropy of magnetic susceptibility data: the bootstrap way. Journal of Geophysical Research, 103(B8):17775–17790.